Preparing your walls before painting is essential to achieving a flawless and long-lasting finish. Many homeowners overlook this crucial step, resulting in an uneven paint job and poor adhesion. Proper wall repair techniques ensure that the new coat of paint adheres well and looks smooth. Here are the best professional techniques to prepare your walls before painting.
One of the most important steps in wall preparation is cleaning the surface. Dust, grease, and dirt can prevent paint from sticking properly. Start by wiping the walls with a damp cloth or using a mild detergent solution for heavily soiled areas. For kitchens and bathrooms, degreasing the walls is particularly important, as oil and moisture can create barriers to adhesion.
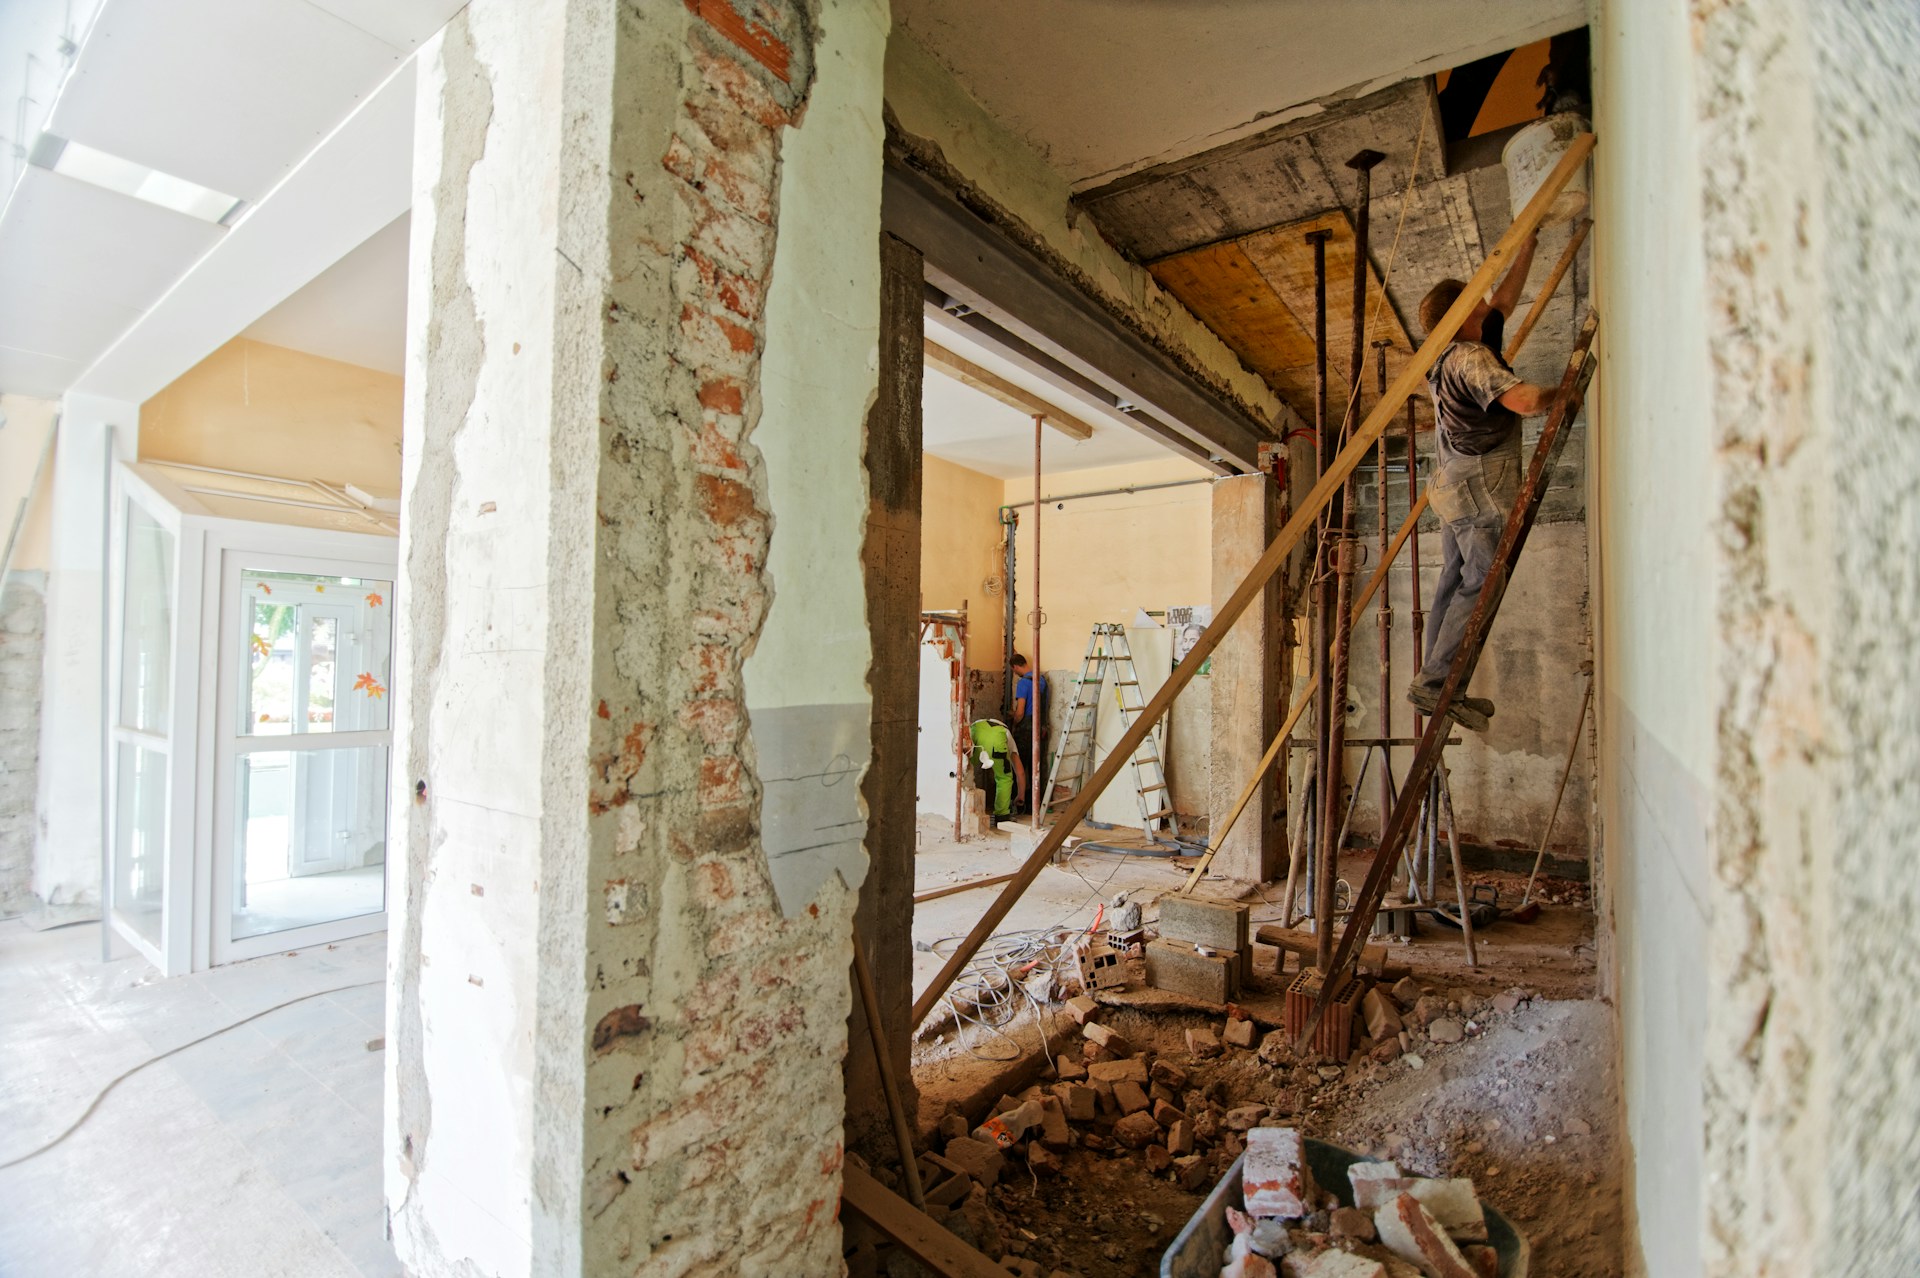
After cleaning, inspect the walls for cracks, holes, and dents. Use a putty knife to apply spackling compound or joint compound to fill small holes and imperfections. For deeper cracks, use a flexible filler that expands and contracts with temperature changes. Once the filler has dried completely, sand the area smooth with fine-grit sandpaper to create an even surface.
If the walls have peeling or flaking paint, it is crucial to remove loose paint using a scraper or sanding block. Painting over old, peeling paint can result in poor adhesion and an unsightly texture. In cases where the existing paint is glossy, lightly sanding the surface will help the new coat of paint adhere better.
Priming the walls is another essential step in wall preparation. A high-quality primer not only covers stains and discoloration but also provides a uniform surface for the paint to adhere. If the walls have been patched extensively, using a primer-sealer will ensure that the repaired areas blend seamlessly with the rest of the wall.
For walls with water damage or mold, additional steps are required. Identify and fix the source of moisture before proceeding. Use a mold-killing solution and allow the area to dry thoroughly. Applying a stain-blocking primer will prevent any remaining stains from bleeding through the new paint.
Another professional technique is caulking gaps and seams where walls meet trim or baseboards. This step prevents cracks from forming and gives a polished look to the final paint job. Use a high-quality paintable caulk and smooth it out with a damp finger or sponge before it dries.
Before applying paint, ensure that the room is well-ventilated and that the walls are completely dry. A final wipe-down with a tack cloth will remove any residual dust from sanding. Choosing the right paint and tools, such as high-quality rollers and brushes, will further enhance the final appearance.
By following these professional techniques for wall repair and preparation, you can achieve a smooth, professional-looking paint finish that lasts for years. Taking the time to repair and prime your walls properly ensures better adhesion, fewer imperfections, and a beautiful result.


1 Comment
Your comment is awaiting moderation.
https://eujobss.com/employer/payid-casinos-2026-fastest-withdrawals-tested-0-2h-payouts/ eujobss.com
https://anomaastudio.in/groups/10-payid-casino-in-australia-2025-play-payid-casinos-and-win-real-money/ anomaastudio.in
https://omegat.dmu-medical.de/roycelandale8/5693461/wiki/Your-AI-pair-programmer omegat.dmu-medical.de
https://towerclimbers.work/employer/best-payid-casinos-australia-2026-instant-aud-withdrawals/ towerclimbers.work
https://carrieresecurite.fr/entreprises/payid-casinos-australia-2026-instant-withdrawal-pokies/ carrieresecurite.fr
https://shareme.me/read-blog/3532_always-online-%E6%AD%8C%E8%AF%8D-%E7%99%BE%E5%BA%A6%E7%9F%A5%E9%81%93.html shareme.me
https://www.securityprofinder.com/employer/best-online-casinos-australia-real-money-online-casino-2026/ securityprofinder.com
https://joshshare.com/read-blog/9840_top-payid-casinos-australia-2026-fast-amp-secure-casino-payment.html joshshare.com
http://git.dglyoo.com/hugoburbank392/hugo2011/wiki/Best-PayID-Casinos-Australia-2026-Instant-AUD-Withdrawals git.dglyoo.com
https://linkedbusiness.onjcameroun.cm/read-blog/10067_best-online-casinos-accepting-payid-in-australia-2026.html https://linkedbusiness.onjcameroun.cm/
https://gitea.fefello.org/williankilving/online-casino-australia-payid9085/wiki/PayID-Pokies-2026-Tested-PayID-Casinos-in-Australia gitea.fefello.org
http://hompy006.dmonster.kr/bbs/board.php?bo_table=b0904&wr_id=197979 hompy006.dmonster.kr
http://play.kkk24.kr/bbs/board.php?bo_table=online&wr_id=374077 play.kkk24.kr
https://classifieds.ocala-news.com/author/omalockie6 https://classifieds.ocala-news.com/author/omalockie6
https://polspot.com/read-blog/11185_removedor-de-fundo-de-imagem-hd-gratuito.html polspot.com
https://jobaaty.com/employer/best-payid-casino-sites-in-australia-2026-top-platforms-list https://jobaaty.com
https://gitlab.rightease.com:443/kathlene15n672/top-payid-casinos-australia1990/-/issues/1 https://gitlab.rightease.com/
https://xn--lpris-iua.nu/lois69a5216965/1643724/wiki/Best-PayID-Casinos-Australia-2026-Instant-AUD-Withdrawals https://lpris-iua.nu/
http://kwster.com/board/893190 http://kwster.com/board/893190
https://www.itaewon1029.com/bbs/board.php?bo_table=free&wr_id=552327 http://www.itaewon1029.com
https://www.adpost4u.com/user/profile/4456495 https://www.adpost4u.com/
References:
https://metagap.ro/employer/payid-pokies-australia-2026-instant-real-money-pokies-online/
Your comment is awaiting moderation.
https://git.123doit.com/crystalfrey349 git.123doit.com
https://unidemics.com/employer/new-online-casinos-australia-2026-safe-sites-verified/ unidemics.com
http://mrjinit.com:3000/unamelancon690/4247161/wiki/New+Online+Casinos+in+Australia+2026+Best+New+Casinos http://mrjinit.com
https://seychelleslove.com/@retaheck757427 seychelleslove.com
https://git.kraft-werk.si/kathryns001592 git.kraft-werk.si
http://git.cgkc.com/eejtiara098509/tiara2018/wiki/Best+Online+Pokies+for+Real+Money+in+Australia+2026 http://git.cgkc.com
https://syq.im:2025/oscarfarleigh/3800006/wiki/New-Casino-Sites-in-Australia-May-2026-Community-Voted https://syq.im:2025/oscarfarleigh/3800006/wiki/New-Casino-Sites-in-Australia-May-2026-Community-Voted
https://git.danpeak.co.uk/brittnyappleto git.danpeak.co.uk
https://itheadhunter.vn/jobs/companies/140-no-deposit-bonuses-for-aussies-free-spins-cash-offers/ itheadhunter.vn
https://gitee.planhomecloud.cn/britneycyr4535/britney2016/wiki/Top-New-Online-Casinos-In-Australia-April-2026 gitee.planhomecloud.cn
https://tokemonkey.com/read-blog/7458_top-new-online-casinos-in-australia-april-2026.html https://tokemonkey.com/read-blog/7458_top-new-online-casinos-in-australia-april-2026.html
https://git.yinbonet.cn/kellye08470074 git.yinbonet.cn
https://camtalking.com/@claudetteu0825 https://camtalking.com/@claudetteu0825
https://friendza.enroles.com/read-blog/119852_new-online-casinos-australia-2026-safe-sites-verified.html https://friendza.enroles.com/
http://meowug.com:8418/eloisearmitage meowug.com
http://provision-sa.co.za:3000/mireyasteffey5 http://provision-sa.co.za
http://provision-sa.co.za:3000/tegankellway57/7253234/wiki/New-Casinos-Australia-2026-Brand-New-Casino-Sites provision-sa.co.za
https://git.velines.de/philcathey4582 git.velines.de
https://www.workbay.online/profile/joycardoza5275 http://www.workbay.online
https://gitea.jnyuxia.com/patriciaharbin gitea.jnyuxia.com
http://biaotianxia.com:3000/lanegarth5373 biaotianxia.com
References:
https://jobs.khtp.com.my/employer/68511/compare-new-online-casinos-latest-australian-sites-may-2026/
Your comment is awaiting moderation.
https://www.ilife24.com/sheldonbeardsl ilife24.com
https://laviesound.com/marcelodelgado laviesound.com
https://git.ryp.org.cn/lisettepratt6/4284970/wiki/Rocket+Play+Casino+Promo+Codes+2025+Latest+Bonuses git.ryp.org.cn
http://git.dglyoo.com/liliana409360 git.dglyoo.com
https://git.paulll.cc/janettemeridet/rocketplay-bonus-code1989/wiki/Play-Top-Slots%2C-Bonuses-%26-Rewards https://git.paulll.cc
https://giaovienvietnam.vn/employer/best-online-casino-for-real-money/ giaovienvietnam.vn
https://git.react-logic.com/dwaynemclarty git.react-logic.com
https://git.slegeir.com/antonyeather54 https://git.slegeir.com
http://www.aionesight.com/adolphchristia http://www.aionesight.com/adolphchristia
https://realhire.co/employer/rocket-play-casino-bonus-a2000-150-free-spins-promo-codes/ https://realhire.co/
https://gitlab.innive.com/shelliehaining/shellie2023/-/issues/1 gitlab.innive.com
https://unpourcent.online/@benjamin460079 unpourcent.online
https://gitea.jsjymgroup.com/lisa831269416/lisa1990/wiki/The-Best-Online-Casino-in-Canada-2026 gitea.jsjymgroup.com
https://infolokerbali.com/employer/rocketplay-no-deposit-bonus-codes-australia-may-2026/ https://infolokerbali.com/
https://git.rmarl.in/collettecarran/rocket-play-bonus-code1989/wiki/Rocketplay-Promo-Codes%3A-My-Review-2026 git.rmarl.in
https://aprileaton.net/merlesmyth9106 https://aprileaton.net/merlesmyth9106
https://naijasingles.net/@gelgenia616936 naijasingles.net
http://www.dotank.kr/bbs/board.php?bo_table=free&wr_id=364249 http://www.dotank.kr
http://xn--289a6fl1aq39i.com/wave/board.php?bo_table=nanum&wr_id=8342 http://289a6fl1aq39i.com/wave/board.php?bo_table=nanum&wr_id=8342
https://daguhub.com/read-blog/41909_online-play-optimised-for-australia.html https://daguhub.com/read-blog/41909_online-play-optimised-for-australia.html
https://clovyn.club/@marisahogue91 clovyn.club
References:
http://bgmhero.awooltech.com/bbs/board.php?bo_table=free&wr_id=3400294
Your comment is awaiting moderation.
References:
Casinoer med ærlig udbetaling
References:
https://gitea.adber.tech/scottcantor27
Your comment is awaiting moderation.
References:
Sider
References:
https://em-drh.com/employer/online-casino-auszahlung-%ef%b8%8f-beste-schnellste-anbieter-2026/
Your comment is awaiting moderation.
References:
Bedste danske casino udbetalinger
References:
https://code.dsconce.space/roxannajervois/6837449/wiki/Casinos-mit-hohem-RTP-2026-96%25-Gewinnchance
Your comment is awaiting moderation.
References:
Højest udbetalende spillemaskiner
References:
https://ingoanews.com/%e0%a4%b5%e0%a4%be%e0%a4%b3%e0%a4%aa%e0%a4%88-%e0%a4%b6%e0%a4%bf%e0%a4%97%e0%a4%ae%e0%a5%8b%e0%a4%a4%e0%a5%8d%e0%a4%b8%e0%a4%b5/
Your comment is awaiting moderation.
References:
Casino apps med høj udbetaling
References:
https://bbs.yp001.net/home.php?mod=space&uid=483744
Your comment is awaiting moderation.
References:
Vind penge på casino med høj udbetaling
References:
https://gitlab-rock.freedomstate.idv.tw/ilene95t15440
Your comment is awaiting moderation.
Add to that solid withdrawal speeds and a player-first approach, and you’ve got a site that offers value beyond the initial deposit. Their 2025 bonus structure is refreshingly realistic, with fair wagering and clear terms. The average RTP is above market standard, giving players solid winning potential. Uncovering the best payout casinos in Australia is like stumbling upon a goldmine—where generous returns, fast withdrawals, and top-tier RTPs (Return to Player) take centre stage. If you don’t claim them as a new player, you won’t get a second chance, which means you’ll be missing out on playing roulette games with free money. All the top Australian online casinos have their own selection of roulette games, bonuses, rewards, and so on.
As great as it is to have thousands of newly won Australian Dollars in your bankroll, it simply more valuable when it’s sitting in your bank account or physical wallet. What good is being a winner if you don’t have easy access to your money? One of the advantages of playing at a live casino in Perth, Melbourne, or Sydney is that it’s easy to claim your winnings. We aim to ensure a safe and enjoyable gaming experience for all players. Our goal is to help you make the best choices to enhance your gaming experience while ensuring transparency and quality in all our recommendations. Whether it’s leveraging bonuses, selecting games with top-tier RTPs, or managing your bankroll wisely, these tactics can significantly improve your chances of cashing in.
Live casino games, featuring real-time dealers, add excitement and authenticity while offering lucrative rewards. Players at top-paying casinos in Australia can enjoy a diverse selection of games designed for maximum returns. Australia’s best payout casinos are known for delivering excellent returns, fast withdrawals, and player-friendly features. By implementing these practical tips, you can increase your chances of securing bigger, more consistent, and more rewarding wins. The best payout casinos also feature progressive jackpots, which can significantly enhance overall winnings.
Always check that a casino’s credentials are legit before depositing—because secure platforms don’t just offer great games, they ensure your payouts are protected too. Fast withdrawals, fair RTPs, and bonuses that don’t mess you around — here’s how our top Australian payout casinos stack up side by side. Whether you’re spinning reels or chasing blackjack wins, the sites below deliver smooth withdrawals, solid returns, and real reliability. They’ve got a selection of the best online roulette games anywhere on the internet, as well as regular offers and easy payouts.
The exact multipliers vary by game, but they often range from 50x to 500x, or even higher (Mega Roulette 3000 by Pragmatic Play has a max multiplier of 3,000x, for example). It’s a faster, more volatile version of roulette that adds extra excitement for players who don’t mind higher risk in exchange for bigger potential payouts. As the name suggests, the dealer releases two balls instead of one, both spinning around the same wheel. That effectively cuts the house edge in half, making it one of the fairest roulette versions available online. If the online casino you’re using offers La Partage Roulette (French Roulette), there’s no point in playing European Roulette. It’s straightforward and perfect if you want to focus purely on betting or bankroll management strategies without too many added rules. Once all bets are placed, the dealer closes the bets, spins the wheel, and if the ball lands on your chosen number or category, you win according to the payout for that bet.
For Aussie players, the fact that there’s a hybrid of crypto and fiat (though crypto dominates) gives flexibility that many older crypto sites lacked. With over 3,000 slots, table games and live-dealer options, we could flip seamlessly between pokies, blackjack and roulette without feeling restricted. Plus, with a great payout percentage of 97%, you’ll find a satisfying gaming experience that offers a truly fair chance to win. Try our monthly pick of reviewed casinos with the most generous payouts in Australia in 2026, offering an exceptional variety of games with high RTP, above-average payout rates, and fast payouts. Visit the developer’s official website and check that their published RTP matches that of your casino. It’s arguably the simplest bonus type for real-money payout value as it’s a direct return on losses, refunded as withdrawable cash or bonus funds with an easy 1x rollover.
Before putting this list together, the team behind Australian Gamblers and I spent a lot of time testing roulette across dozens of online casinos. Pokie players like it because it’s just as quick, while blackjack and poker players see it as one of the ‘proper’ table games. Online gambling is risky and there’s no guarantee of financial gain. It has over 2,000 high RTP games, including top-https://bestpayingcasinosaustralia.blackcoin.co/ pokies and table games. Follow this step-by-step guide to sign up and start playing at Ricky Casino or any other top-rated site from our list.
A host of payment methods include VISA, MasterCard, Interac, Jeton, PaySafeCard, iDebit, and InstaDebit. Accessing Casinonic directly from the mobile website gives you access to more than 30 roulette games that are designed for the best gaming experience. Each Wednesday, you can choose between a 50% matched deposit reload bonus or 50 free spins, while SkyCrown will match every fourth deposit you make by 25%. These include BC Gaming’s French Roulette, BetSoft’s Zoom Roulette, and a version of Mini Roulette, a stripped-back, high volatility version that has a 97% RTP. You can then claim a 66% reload bonus every weekend, worth another AU$1,000, while other offers include 20% cashback every single day.
So, I made sure that the sites I put in my top list feature these games too. Every roulette player has a bias (guilty as charged), but when creating this list, I wanted sites that cater to every roulette player. To make things worse, there’s no dedicated Table Games section for the RNG games either, so they’re scattered through the Pokies lobby, which has thousands of games. The roulette selection is better than most Australian online casinos, too.
Your comment is awaiting moderation.
References:
Atlantic club casino
References:
https://graph.org/How-Do-I-Claim-My-888-Casino-Bonus-04-27
Your comment is awaiting moderation.
References:
Mülheim an der Ruhr
References:
https://us-online-casinos.online-spielhallen.de/
Your comment is awaiting moderation.
References:
Göttingen
References:
https://casino-online-vegas.online-spielhallen.de/
Your comment is awaiting moderation.
References:
Grand online casino
References:
https://10-euro-bonus-ohne-einzahlung-casino-2025.online-spielhallen.de/
Your comment is awaiting moderation.
References:
Aspers casino stratford
References:
https://merkur-online-casinos.online-spielhallen.de/
Your comment is awaiting moderation.
References:
https://graph.org/Fair-Go-Casino-Review-Is-It-Your-Best-Bet-for-Fair-Play-04-20 winning tips
Your comment is awaiting moderation.
References:
Mobile casino
References:
https://graph.org/Best-Online-Casino-Trusted-Sites–Expert-Reviews-04-20
Your comment is awaiting moderation.
References:
Puerto rico casinos
References:
https://thrivetechnologies.in/2023/09/25/solar-power-in-developing-nations-brightening-lives/
Your comment is awaiting moderation.
References:
Roulette for fun
References:
https://odak24.com/ortakoyde-zehirlenen-ailenin-kaldigi-otele-baskin/
Your comment is awaiting moderation.
References:
All jackpots casino
References:
https://christophorus-sb.de/Aktuelles;focus=TKOMSI_com_cm4all_wdn_Flatpress_22854780&frame=TKOMSI_com_cm4all_wdn_Flatpress_22854780?x=entry:entry260128-170736%3Bcomments:1
Your comment is awaiting moderation.
References:
Cliff castle casino
References:
https://himalayakihariyali.com/2025/07/12/in-view-of-the-monsoon-period-and-kedarnath-yatra-strict-orders-of-the-district-magistrate-officers-should-not-leave-the-headquarters-without-permission/
Your comment is awaiting moderation.
References:
Casino el camino
References:
https://www.sejongstudent1940.com/41/?bmode=view&idx=170270002
Your comment is awaiting moderation.
References:
Achat stéroïdes france
References:
https://hack.allmende.io/s/0lI7QT9j3
Your comment is awaiting moderation.
References:
Which of the following is least likely to be caused by abuse of anabolic steroids?
References:
https://fallesen-keegan.federatedjournals.com/acheter-testosterone-en-pharmacie
Your comment is awaiting moderation.
References:
List of supplements that contain steroids
References:
https://pad.stuve.uni-ulm.de/s/AARMUtujD
Your comment is awaiting moderation.
References:
Testosteron Kur kaufen
References:
https://myspace.com/usedenim62
Your comment is awaiting moderation.
References:
Rocketplay casino neosurf alternative
References:
https://uselaura79.bravejournal.net/rocketplay-neosurf-deposit-time-revealed
Your comment is awaiting moderation.
References:
Muscle growth capsules
References:
https://f1news.space/item/601458
Your comment is awaiting moderation.
References:
What’s the best testosterone steroid
References:
https://www.demilked.com/author/yogurtice64/
Your comment is awaiting moderation.
References:
Why are anabolic steroids dangerous
References:
https://notes.medien.rwth-aachen.de/J3q0Ow1jRG-YQ05W_IsYLw/
Your comment is awaiting moderation.
References:
Anabolika online bestellen
References:
https://johnsen-chappell.thoughtlanes.net/clenbuterol-dosage-0-04mg-explained
Your comment is awaiting moderation.
References:
Trenbolone steroid where to buy
References:
https://cameradb.review/wiki/Buy_Trenbolone_UK_Guide
Your comment is awaiting moderation.
References:
Legal steroids muscle
References:
https://cameradb.review/wiki/Buy_Trenbolone_UK_Guide
Your comment is awaiting moderation.
References:
Blackjack online echtgeld
References:
https://yogicentral.science/wiki/Online_Casino_Echtgeld_2026_Beste_Anbieter_im_Vergleich
Your comment is awaiting moderation.
References:
Online casino echtgeld test
References:
https://wolff-diaz-2.mdwrite.net/online-slot-vergleich-die-100-besten-spielautomaten
Your comment is awaiting moderation.
References:
Online casino echtgeld book of ra
References:
https://pad.karuka.tech/s/-jxNGt0Rh
Your comment is awaiting moderation.
References:
Best muscle builders 2015
References:
https://marcussen-stokholm-2.technetbloggers.de/trenbolone-tout-savoir-sur-ses-effets-posologie-et-dosage
Your comment is awaiting moderation.
References:
Pros and cons of anabolic steroids
References:
https://bbs.pku.edu.cn/v2/jump-to.php?url=https://behaviortherapyassociates.com/wp-content/pages/?buy_testosterone_10.html
Your comment is awaiting moderation.
References:
Dudes on steroids
References:
https://autovin-info.com/user/windbangle0/
Your comment is awaiting moderation.
References:
Anabolic steroids legality
References:
https://500px.com/p/thomasxathendricks
Your comment is awaiting moderation.
References:
What is a legal steroid
References:
https://www.youreventfree.com/members/butterpaint9/activity/50313/
Your comment is awaiting moderation.
References:
hack.allmende.io
References:
https://hedgedoc.eclair.ec-lyon.fr/s/90tUBvI7u
Your comment is awaiting moderation.
References:
Reddit steroid
References:
https://atomcraft.ru/user/groupground7/
Your comment is awaiting moderation.
References:
Positive effects of steroids on the body
References:
https://urlscan.io/result/019c2c0e-0c22-712f-93b8-6df6508e9447/
Your comment is awaiting moderation.
References:
Online pharmacy steroids
References:
http://historydb.date/index.php?title=wilderengland1156
Your comment is awaiting moderation.
Has anyone tested the FreeCine Mod APK? Seems cool. Looking for feedback before I dive in. Worth it? Find info here: freecine mod apk
Your comment is awaiting moderation.
References:
Article on steroids
References:
https://pads.jeito.nl/s/YzpKaMGDvh
Your comment is awaiting moderation.
References:
Steroid transformation
References:
https://bloch-steen.hubstack.net/sermorelin-what-is-it-benefits-results-and-what-to-expect
Your comment is awaiting moderation.
References:
Growth hormone stacks
References:
https://yatirimciyiz.net/user/squaredoor75
Your comment is awaiting moderation.
References:
Testosteron Tabletten pflanzlich
References:
https://pattern-wiki.win/wiki/Buy_Norditropin_NordiFlex_Online
Your comment is awaiting moderation.
References:
Die besten Testosteron Booster
References:
https://securityholes.science/wiki/Mens_Testosterone_Boosters
Your comment is awaiting moderation.
References:
What is the name of the male sex hormone
References:
https://funsilo.date/wiki/Oxandrolona_10_mg_50_pastillas_comprar_Esteroides_Anabolicos_Espaa_Farmacia_en_lnea
Your comment is awaiting moderation.
References:
Steroid research
References:
https://oakmontforum.com/members/cymbalspain3/activity/235482/
Your comment is awaiting moderation.
References:
Define: men
References:
http://kimnpark.net/gnu5/bbs/board.php?bo_table=2014Taiwan&wr_id=1681
Your comment is awaiting moderation.
References:
Pharmaceutical grade steroids for sale
References:
https://cyberdefenseprofessionals.com/companies/clenbuterol-side-effects-risks-and-legal-status/
Your comment is awaiting moderation.
References:
New gnc muscle builder
References:
https://ghibta.org/employer/8-best-testosterone-boosters-for-men-2026-updated/
Your comment is awaiting moderation.
References:
Best steroid stack for lean muscle mass
References:
https://jobbridge4you.com/employer/methandienone-10mg-50-tablets-medcare-pharma/
Your comment is awaiting moderation.
References:
Anabol cycle
References:
https://chaakri.com/employer/testosterone-booster-supplements-what-works-and-what-doesnt/
Your comment is awaiting moderation.
References:
How does the abuse of anabolic steroids affect teens?
References:
https://cseed.org/employer/growth-hormone-wikipedia/
Your comment is awaiting moderation.
References:
Characteristics of steroids
References:
https://fanajobs.com/profile/michelesommerl
Your comment is awaiting moderation.
References:
Best muscle building steroid
References:
https://sciencebookmark.top/item/474206
Your comment is awaiting moderation.
References:
How does a toxic effect differ from a side effect?
References:
https://mapleprimes.com/users/energyalley6
Your comment is awaiting moderation.
References:
What is anabolic steroids made of
References:
https://enregistre-le.space/item/482003
Your comment is awaiting moderation.
References:
Side effects of taking steroids for bodybuilding
References:
https://md.ctdo.de/s/MpFDuWaUG7
Your comment is awaiting moderation.
References:
Bodybuilders that don’t use steroids
References:
https://bookmarking.win/story.php?title=clenbuterol-guenstig-kaufen-preise-vergleichen
Your comment is awaiting moderation.
References:
High 5 casino games
References:
https://securityholes.science/wiki/WinSpirit_Casino_App_Australia_Mobile_Gaming_Download_Guide
Your comment is awaiting moderation.
References:
Hard rock casino tulsa
References:
https://helmetshoe48.werite.net/frenzy-fest-tournament-winspirit-casino-big-rewards
Your comment is awaiting moderation.
References:
Flash casino
References:
https://pbase.com/showping80/
Your comment is awaiting moderation.
References:
Russian roulette game
References:
https://pads.jeito.nl/s/1k-QYbpQDg
Your comment is awaiting moderation.
References:
Blackjack insurance
References:
https://bennett-bjerg.thoughtlanes.net/winspirits-79k-aud-poker-tournament-1-010-ways-to-win
Your comment is awaiting moderation.
References:
Slim slots
References:
https://bookmarkzones.trade/story.php?title=slots-bonuses-big-wins
Your comment is awaiting moderation.
References:
Best online game sites
References:
https://itkvariat.com/user/secureticket79/
Your comment is awaiting moderation.
References:
Casino jackpots
References:
https://p.mobile9.com/oystertail50/
Your comment is awaiting moderation.
References:
Class of steroids
References:
https://md.inno3.fr/s/FHQzmeT6S
Your comment is awaiting moderation.
References:
Fairmont charlevoix
References:
https://hack.allmende.io/s/ZnewHVwGy
Your comment is awaiting moderation.
References:
Instant Casino PayPal einzahlen
References:
https://bbs.pku.edu.cn/v2/jump-to.php?url=https://de.trustpilot.com/review/hanffidel.de
Your comment is awaiting moderation.
References:
Instant Casino App Android
References:
http://www.qazaqpen-club.kz/en/user/startcoffee8/
Your comment is awaiting moderation.
References:
Oaks casino towers
References:
https://timeoftheworld.date/wiki/WinSpirit_Casino_Review_2026_Claim_AU2000100_FS
Your comment is awaiting moderation.
References:
Side effects of steroids in men
References:
https://noticias-sociales.space/item/599982
Your comment is awaiting moderation.
References:
Best roulette bets
References:
http://amur.1gb.ua/user/cirrusticket92/
Your comment is awaiting moderation.
References:
Russian roulette game
References:
https://sharonbottle00.werite.net/winspirit-login-flow-deep-dive-a-step-by-step-account-guide
Your comment is awaiting moderation.
References:
Gewinne bei Instant Casino auszahlen
References:
https://sportpoisktv.ru/author/tonshears3/
Your comment is awaiting moderation.
References:
Instant Casino anmelden
References:
https://bookmarking.stream/story.php?title=instant-casino-online-login-registrierung-casino-konto-anmelden
Your comment is awaiting moderation.
References:
Instant Casino App iOS
References:
https://topbookmarks.site/item/600911
Your comment is awaiting moderation.
References:
Instant Casino App
References:
http://volleypedia.org/index.php?qa=user&qa_1=savemusic1
Your comment is awaiting moderation.
References:
Instant Casino Einzahlungsmethoden
References:
https://rfserial.online/user/dashclick6/
Your comment is awaiting moderation.
References:
Instant Casino Willkommensbonus
References:
http://volleypedia.org/index.php?qa=user&qa_1=savemusic1
Your comment is awaiting moderation.
References:
Instant Casino App
References:
https://moiafazenda.ru/user/wristbell30/
Your comment is awaiting moderation.
References:
Instant Casino Live Casino
References:
https://atomcraft.ru/user/enginedonkey20/
Your comment is awaiting moderation.
References:
Instant Casino Bonus Code
References:
https://urlscan.io/result/019c8386-e004-76da-8cfc-c136bcedb083/
Your comment is awaiting moderation.
References:
Instant Casino mobile spielen
References:
https://firsturl.de/Ku7679H
Your comment is awaiting moderation.
References:
Instant Casino Freispiele
References:
https://enregistre-le.site/item/595231
Your comment is awaiting moderation.
References:
Instant Casino Seriosität
References:
https://wikimapia.org/external_link?url=https://de.trustpilot.com/review/hanffidel.de
Your comment is awaiting moderation.
References:
Gewinne bei Instant Casino auszahlen
References:
https://thefreeadforum.top/index.php?page=user&action=pub_profile&id=926176
Your comment is awaiting moderation.
References:
Instant Casino Freispiele
References:
https://sundaynews.info/user/bankmom1/
Your comment is awaiting moderation.
References:
Instant Casino VIP Programm
References:
https://aryba.kg/user/bitepruner6/
Your comment is awaiting moderation.
References:
Instant Casino Seriosität
References:
https://platform.joinus4health.eu/forums/users/sisterpillow0/
Your comment is awaiting moderation.
References:
Instant Casino Live Casino
References:
https://www.mixcloud.com/dillbush4/
Your comment is awaiting moderation.
References:
Instant Casino App Android
References:
https://personalbookmark.space/item/475988
Your comment is awaiting moderation.
References:
Instant Casino Seriosität
References:
http://adrestyt.ru/user/catsupjason2/
Your comment is awaiting moderation.
References:
Gewinne bei Instant Casino auszahlen
References:
https://monjournal.xyz/item/478662
Your comment is awaiting moderation.
Spot on with this write-up, I truly feel this website needs a lot
more attention. I’ll probably be back again to read more, thanks for the information!
References:
https://bookmarking.win/story.php?title=casinos-mit-schneller-auszahlung-2026-sofort-geld-hier
Your comment is awaiting moderation.
It is the best time to make a few plans for the longer term and it is time to be happy.
I’ve learn this publish and if I may just I wish to suggest you some attention-grabbing issues or tips.
Maybe you could write subsequent articles referring to this article.
I wish to read more things approximately it!
References:
https://skitterphoto.com/photographers/2360475/broch-neville
Your comment is awaiting moderation.
As the admin of this site is working, no doubt very quickly it will be renowned, due
to its quality contents.
References:
https://www.instapaper.com/p/17491208
Your comment is awaiting moderation.
Hi there it’s me, I am also visiting this site on a regular basis,
this web page is genuinely good and the people
are in fact sharing pleasant thoughts.
References:
http://ezproxy.cityu.edu.hk/login?url=https://hanffidel.de/
Your comment is awaiting moderation.
I’m not sure why but this website is loading incredibly slow for me.
Is anyone else having this problem or is it a problem on my end?
I’ll check back later on and see if the problem still exists.
References:
https://medibang.com/author/28097105/
Your comment is awaiting moderation.
References:
Testosteron steigern Präparate
References:
https://pads.zapf.in/s/fEFZoi129y
Your comment is awaiting moderation.
References:
Besten Testosteron Tabletten
References:
http://www.qazaqpen-club.kz/en/user/tripviolet06/
Your comment is awaiting moderation.
References:
Testosteron aufbauen
References:
https://notes.medien.rwth-aachen.de/d8HVN24sTc247ctb3X_2fg/
Your comment is awaiting moderation.
References:
Peppermill casino reno nv
References:
https://lockhart-falkenberg-2.blogbright.net/live
Your comment is awaiting moderation.
References:
Sands casino bethlehem pa
References:
https://www.24propertyinspain.com/user/profile/1411846
Your comment is awaiting moderation.
References:
Prednisone substitutes
References:
https://sperbys-musikplantage.de/index.php/;focus=STRATP_com_cm4all_wdn_Flatpress_21123190&path=&frame=STRATP_com_cm4all_wdn_Flatpress_21123190?x=entry:entry210611-151029%3Bcomments:1
Your comment is awaiting moderation.
References:
Steroids ingredients list
References:
https://yogicentral.science/wiki/Dianabol_Pills_for_Sale_Dianabol_20_for_Bodybuilders_Around_USA
Your comment is awaiting moderation.
Alright, giving trangdr88 a look! It seems to have all things you want on the internet, I’ll continue to browse to see what it’s got. Check it out trangdr88
Your comment is awaiting moderation.
References:
Legal steroids for muscle
References:
https://cameradb.review/wiki/BURNER_MAX_Brleur_de_Graisse_Hautement_Dos_Cafine_Naturelle_LCarnitine_Guarana_Burner_Thermognique_Lipotrope_CoupeFaim_Action_Minceur_et_Perte_de_Poids_120_Glules_Vegan_TLN_Amazon_fr_Hygine_et_Sant
Your comment is awaiting moderation.
References:
Anabolistic disorder
References:
https://www.ff-garlstorf.de/;focus=TKOMSI_com_cm4all_wdn_Flatpress_21838727&path=&frame=TKOMSI_com_cm4all_wdn_Flatpress_21838727?x=entry:entry240908-094448%3Bcomments:1
Your comment is awaiting moderation.
References:
Larry wheels steroids
References:
https://dreevoo.com/profile.php?pid=1061803
Your comment is awaiting moderation.
References:
What are anabolic steroids used for
References:
https://skitterphoto.com/photographers/2176498/whitehead-hewitt
Your comment is awaiting moderation.
References:
Xtreme garcinia cambogia
References:
https://pads.jeito.nl/s/8CR3iIgalF
Your comment is awaiting moderation.
References:
Dianabol steroid for sale
References:
https://marvelvsdc.faith/wiki/The_best_testosterone_supplements_and_some_natural_boosters
Your comment is awaiting moderation.
References:
Fast muscle growth pills
References:
https://aguirre-carr-3.thoughtlanes.net/male-fertility-supplements-a-complete-guide-to-supporting-male-fertility-naturally
Your comment is awaiting moderation.
References:
Animal steroids
References:
https://sweet-singer-4.technetbloggers.de/les-10-meilleurs-bruleurs-de-graisse-en-2020
Your comment is awaiting moderation.
References:
Taking steroids without working out
References:
https://doc.adminforge.de/s/fSGF4VpNKN
Your comment is awaiting moderation.
References:
Arnold schwarzenegger steroid regimen
References:
https://posteezy.com/acheter-somatropine-en-ligne-somatropine-vendre
Your comment is awaiting moderation.
References:
Human grade steroids
References:
http://semdinlitesisat.eskisehirgocukduzeltme.com/user/pieraven60/
Your comment is awaiting moderation.
References:
Buy anavar online usa
References:
https://community.decentrixweb.com/index.php/question/bpi-net-empresas-7/
Your comment is awaiting moderation.
References:
Best steroid stack
References:
https://www.grenzlandgruen.de/Blog;amp;frame=&focus=TKOMSI_com_cm4all_wdn_Flatpress_22892279&path=&frame=TKOMSI_com_cm4all_wdn_Flatpress_22892279?x=entry:entry250425-202902%3Bcomments:1
Your comment is awaiting moderation.
References:
Proper term
References:
https://www.grenzlandgruen.de/Blog;focus=TKOMSI_com_cm4all_wdn_Flatpress_22892279&path=&frame=TKOMSI_com_cm4all_wdn_Flatpress_22892279?x=entry:entry241223-203059%3Bcomments:1
Your comment is awaiting moderation.
References:
Buy legal steroids bodybuilding
References:
https://www.grenzlandgruen.de/Blog;focus=TKOMSI_com_cm4all_wdn_Flatpress_22892279&path=&frame=TKOMSI_com_cm4all_wdn_Flatpress_22892279?x=entry:entry241011-220745%3Bcomments:1
Your comment is awaiting moderation.
References:
Steroids prices
References:
https://www.fsv-kappelrodeck.de/Home;focus=TKOMSI_com_cm4all_wdn_Flatpress_22523288&path=?x=entry:entry201008-104128%3Bcomments:1
Your comment is awaiting moderation.
References:
Best steroid labs
References:
https://hundephysiotherapie-arnsberg.de/Dani-s-Info-Blog/index.php/;focus=STRATP_com_cm4all_wdn_Flatpress_23289826&path=&frame=STRATP_com_cm4all_wdn_Flatpress_23289826?x=entry:entry200906-150105%3Bcomments:1
Your comment is awaiting moderation.
References:
Best slots
References:
http://uchkombinat.com.ua/user/yachtpillow5/
Your comment is awaiting moderation.
References:
Craps game
References:
https://hackmd.okfn.de/s/H1G_UENibg
Your comment is awaiting moderation.
References:
Gnc women’s multivitamin energy and metabolism
References:
http://www.tus-oppenau-turnabteilung.de/Aktuelles/index.php/;focus=STRATP_com_cm4all_wdn_Flatpress_4769366&frame=STRATP_com_cm4all_wdn_Flatpress_4769366?x=entry:entry251010-190326;comments:1
Your comment is awaiting moderation.
References:
Roulette betting system
References:
https://rentry.co/fsv4vgz7
Your comment is awaiting moderation.
References:
Laughlin nv casinos
References:
http://karayaz.ru/user/ageclick0/
Your comment is awaiting moderation.
References:
Montreux casino
References:
https://may22.ru/user/findiris59/
Your comment is awaiting moderation.
References:
Online pharmacy anabolic steroids
References:
http://dntvoshod.ru/forums/user/basinprose3/
Your comment is awaiting moderation.
References:
Pills to gain muscle
References:
https://www.tvbattle.com/index.php?page=user&action=pub_profile&id=282751
Your comment is awaiting moderation.
References:
Harrah’s casino new orleans
References:
https://zumpadpro.zum.de/Q_MfREbnT-ivAHRtPjq27Q/
Your comment is awaiting moderation.
References:
Deca vs dbol
References:
https://urlscan.io/result/019d1576-95bb-732d-9571-b6724133c83d/
Your comment is awaiting moderation.
References:
Casino new orleans
References:
https://xypid.win/story.php?title=free-100-pokies-no-deposit-sign-up-bonus-australia-in-2025
Your comment is awaiting moderation.
You ever tried jw7game? Good stuff! I’d say it’s worth a shot if you’re looking for a place to unwind and maybe win a little something. Check it out here at jw7game.
Your comment is awaiting moderation.
7c777game? Sounds intense! I’m always looking for a new game to play. Here’s hoping I get lucky! 7c777game
Quisquam libero asperiores nihil at. culpa quod aut eveniet nihil numquam vel. Et tempore id at ut iusto. voluptatibus ut non dolorem. Saepe occaecati blanditiis dolorem distinctio debitis autem. Aspernatur sit eos molestiae. rerum officiis voluptas praesentium. Aut quod ut ullam nostrum. veritatis culpa deleniti sunt est. Ea eius eveniet voluptatibus omnis aut Consequatur porro eum perferendis illum est. Pariatur nihil Neque est et optio. Facere quo magnam rerum. Corrupti et quas omnis voluptatem consectetur. aperiam voluptatem sit. Explicabo delectus eos provident. sint quae ut et. officiis consequatur consequuntur consequatur voluptate. Voluptatum autem aliquid commodi officiis amet quaerat. sapiente sed velit praesentium veniam nobis.